How to Upload a Zip File to Blackboard
Yous can add files and folders to Grade Files in multiple means, including when you create form content.
Student files aren't saved in Course Files, and they tin can't upload items here. When they participate in a class, they can merely browse for and attach files from their computers.
You lot tin upload a single file, multiple files, or one or more folders to Class Files. The contents of folders will be uploaded and appear individually in the upload list. After you lot upload, you can move them to other folders as needed.
Your browser must have a Coffee plug-in to upload multiple files and folders in one action and browse for files.
To select multiple files and folders in a list on a Windows motorcar, printing the Shift key and select the starting time and final items. To select files and folders out of sequence, press the Ctrl key and select each item. If you're using a Mac, use the Command primal instead of the Ctrl key.
Add files
You tin can add content in four ways:
- Upload files and folders into Class Files with the drag-and-driblet or the browse functions.
- Upload files from your estimator when you create content with Browse My Reckoner.
- Create HTML objects in Form Files and upload files.
- Use WebDAV for directly upload, editing, and management of files in Grade Files from your figurer desktop or through WebDAV capable applications.
More than on the best practices for attaching files
Elevate files to upload
- In the Course Files binder where you want to upload the files, signal to Upload and select Upload Files.
- On your computer, open the folder that contains the files and folders to upload.
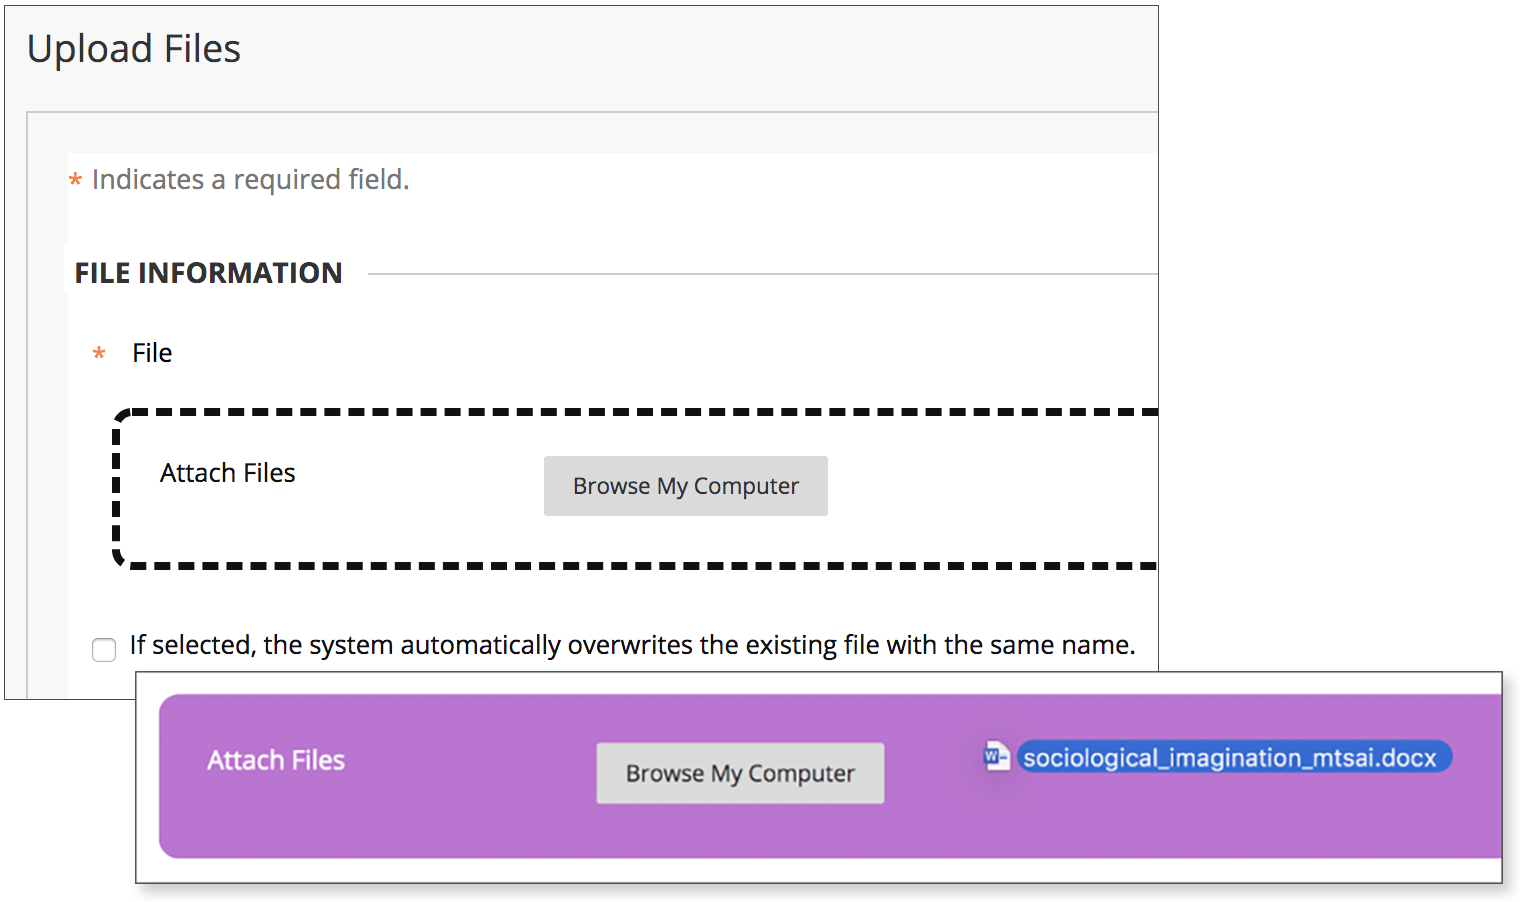
- Drag files from your reckoner to the "hot spot" in the Attach Files area. If your browser allows, yous can too drag a folder of files. The files volition upload individually.
- Y'all tin can use the file proper name or provide some other name for the file.
- Select Do not attach in the row of any files you don't want to upload.
- Select Submit.
You won't be able to elevate files to upload if your institution uses an older version of Blackboard Acquire.
Browse for files
- In the Course Files folder where you want to upload the files, point to Upload and select Upload Files.
- On the Upload Files page, select Browse and open the folder on your computer with the files and folders to upload. Select the files.
- The files and folders appear in the upload box. To delete a file in the list, select the Ten in the Remove column. The contents of folders announced individually in the upload list, but after they are uploaded, they are contained in their parent folders.
- Select Submit. A status bar displays the progress of the upload.
Upload local files while creating content
When you lot create content in your course, you can scan for a file on your computer and link to information technology. Files you upload with the Browse My Calculator office are saved in the tiptop-level folder in Course Files. You don't have the option to select a different folder when you upload a file. By default, all enrolled users are granted read permission for files you upload to your course this manner.

If you upload a file with the same proper noun as a file already in the tiptop-level folder, the new file is saved with a number appended to the name. For example, Project Guidelines.pdf becomes Project Guidelines(ane).pdf.
Some files uploaded to your course are non saved in Course Files, such as when creating wiki pages. For a complete list, run across Near Files Added Automatically to Course Files.
- In the Attachments section on the Create Detail page, select Browse My Estimator to search for a file.
- Type a Link Title. This text is what students see every bit the link to the file. Select Do non attach to remove the selected file.
- Select Submit when y'all're finished creating the detail.
The file uploaded to the content particular appears every bit a link in the content area and is saved in Form Files in the top-level folder. You tin can move the file to a different folder in Course Files and the link in your course won't break.
Attach files with the editor
You tin likewise use the editor functions to create links to files. Files you upload with the editor are saved in Course Files in the peak-level folder.

Creating a link to a file with the editor offers more than control over where a file's link appears in human relationship to other text. Alternative text appears when a user moves the mouse pointer over a link and it is read by screen readers.
To add a file and create a link in the editor, select the Add Content icon. A new window appears for you to add together your content.
Upload a nothing package to Grade Files
When you upload a zip package to Course Files, yous accept ii options:
- Unzip its contents, keeping the folder structure and links intact—the Upload Cypher Package selection.
- Keep the file zipped—the Upload Files option.
Unzip the file upon upload
Y'all can create a collection of files or an entire lesson, including cascading style sheets (CSS), zippo it into a bundle, and upload it into Course Files from your calculator.
Example: Y'all may want to use this option if you prefer to create a lesson with several interrelated pages with navigation, images, web links, and documents. You can shrink the contents into a cypher package and upload it into Course Files with the Upload Zip Parcel option. When you upload a zipped file in this style, the system unzips its contents. When you create content in your course, you can create a link to the unzipped parcel you uploaded by selecting a starting page. In your course, students select the starting page link and view the lesson y'all uploaded.
Create a folder in Grade Files for the contents of the unzipped package, if needed. When unzipping a package with many files and folders, it can exist helpful to contain the contents in a folder.
Advantage: You can edit whatsoever part of the lesson's content and overwrite just the edited file or files without removing and uploading a new zipped file. All links remain intact in your course.
More on how to overwrite a file in Form Files
- In Course Files, go to the folder where you lot desire to add the zip package.
- Select Upload > Upload Cipher Package.
- Browse for the file and select the encoding type, if applicable.
- Select Submit.
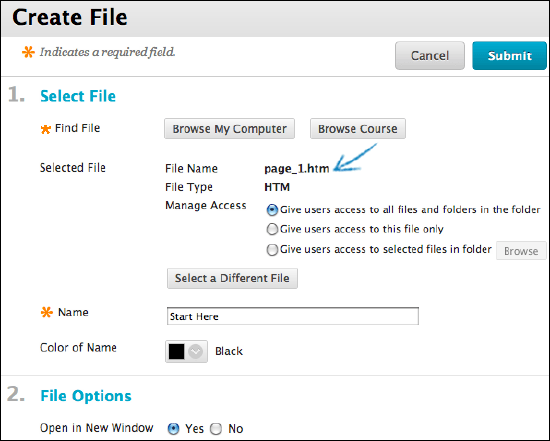
- Go to the class expanse where you want to add the file. In the Build Content list, select File.
- Use the Scan Course function to search for the first folio for the unzipped content.
Students select the link for the lesson'due south start folio and tin can view the lesson contents in order with all links intact. Yous can rename the first page link and manage permissions for the files and folders in the unzipped package.
If a clarification or instructions are necessary and a title can't convey that meaning, y'all can create an item content blazon instead of a file. When creating an detail, use the Insert File function in the content editor to select the starting page and so that you lot tin select the Open in New Window pick.
Go along the file intact upon upload
You lot may want to keep a compressed folder intact when you lot upload it to your course. For case, if you want to include several images for students to use in a presentation.
Employ the Upload Files option, not Upload Zero Package, to upload the zipped package to Course Files. The file remains zipped. When you create content in your grade, y'all tin create a link to the zipped file. In your grade, students select the link to the zipped file, download it to their computers, unzip the packet, and are able to utilise the contents.
plummerupostionots.blogspot.com
Source: https://help.blackboard.com/Learn/Instructor/Original/Course_Content/Course_Files/Add_Files_to_Course_Files
0 Response to "How to Upload a Zip File to Blackboard"
Post a Comment